Like I promised you before, this part is intended to explain, in depth, how to manually create and set partitions during installation process.
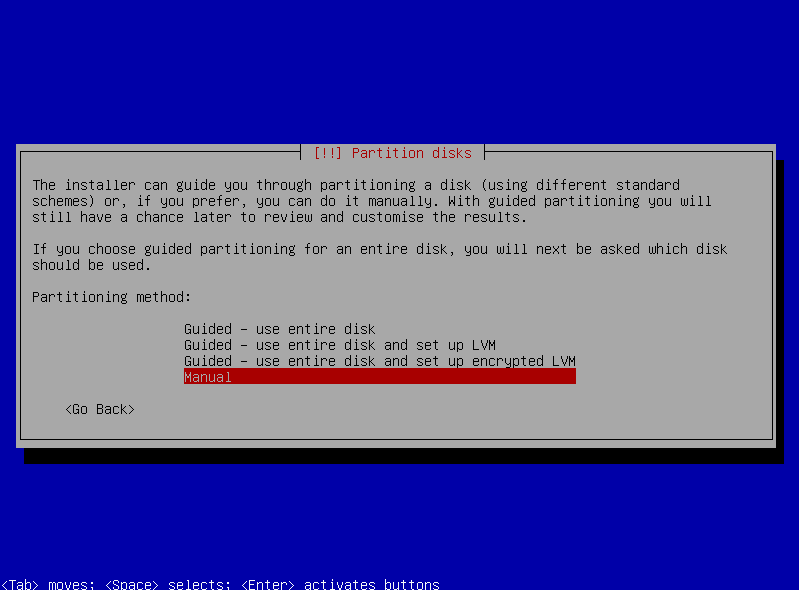
First thing to do is choose Partitioning method as Manual just like in the image below.
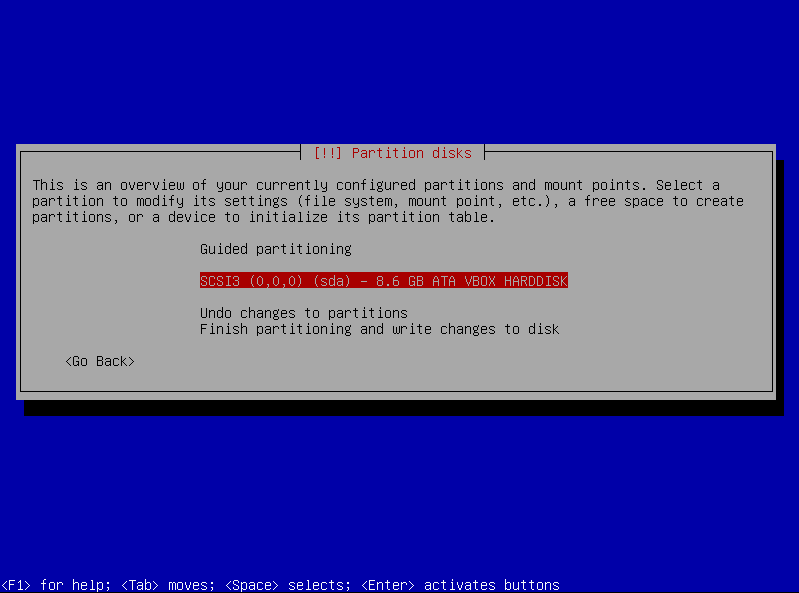
Next step is choosing the drive on which we will install the OS. If you have multiple drives on you computer, the setup will list all of them and let choose which one to use. Selecting a drive is a pretty straight forward process: use you UP and DOWN arrow key to navigate through drives and once you decided which drive to use press ENTER to select it. As you can see in the image below I have a single drive under my virtual machine listed as SCSI3 (0,0,0) (sda) – 8.6 GB ATA VBOX HARDDISK. SDA tell us that this is the drive connected on the first S-ATA port. If my machine would have more than one S-ATA drive, the other drives would be listed as sdb, sdc, etc. ATA drives, under Linux/Unix systems, will be list as hda, hdb, etc.
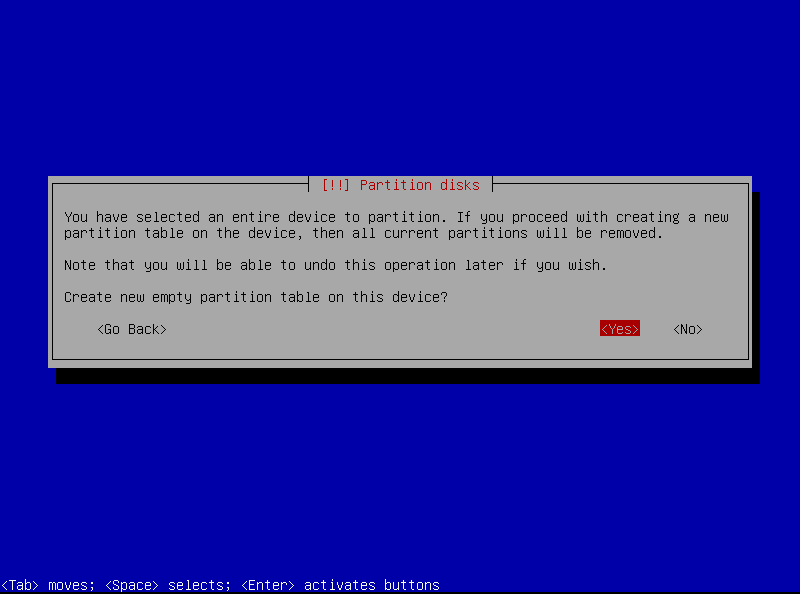
Once the desired drive is selected, when hit the ENTER key, Debian setup will prompt you to create an empty partition table for that drive. Just confirm by choosing option <Yes> and press ENTER key.
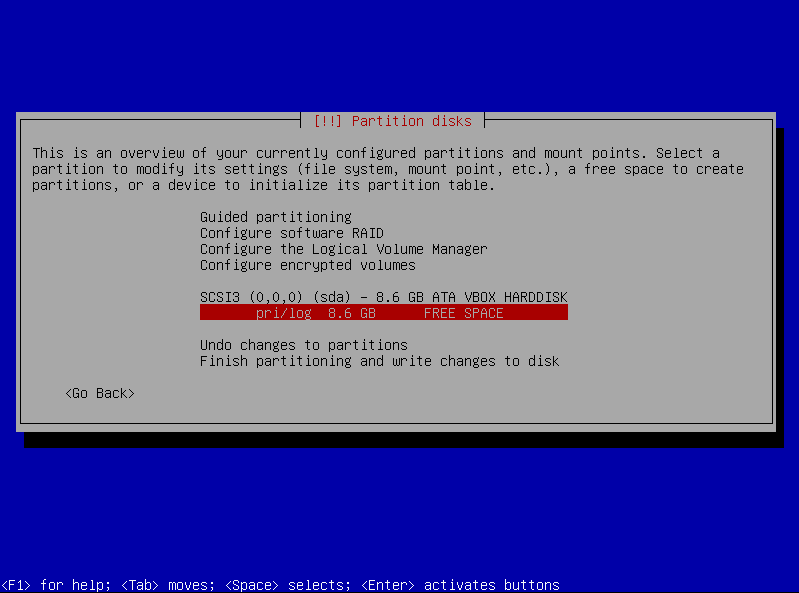
Now e have a “clean” driver ready to be partitioned, just like you see in the image below. In order to start creating the partitions we will have to select the pri/log 8.6 GB FREE SPACE and hit the ENTER key.
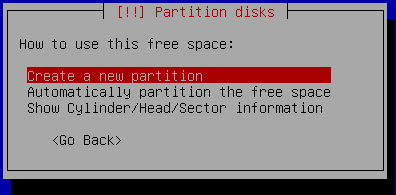
A new menu will come up, giving us 3 options:
- Create a new partition
- Automatically partition the free space
- Show Cylinder/Head/Sector information
We will choose Create a new partition.
Now we will have to set the size. For my example I chose 4,6 GB. I chose to give a numeric value, but there are other option. You could delete everything in the input field and write 50% and the setup will know to “split” the disk in half and set for the current partition 4,3 GB. After you set the size, use TAB key to select continue and them press ENTER.
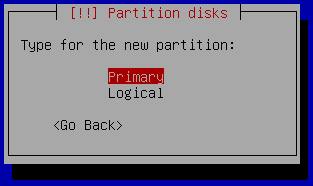
Set the type of the newly created partition by choosing Primary or Logical from the next menu.
IMPORTANT: Linux/Unix system will allow you to have maximum 5 partitions set as Primary. If in your system you will have more than 5 partitions, the 6th, 7th and so on, will be automatically set as Logical, so be careful, and plan ahead if you think, having more then 5 partitions will be case for you (some users will like to create separate partitions for /home /var /mnt etc).
Next we will choose where to create the partition on the disk. We can choose from two options only: Beginning and End. After choosing your option press ENTER key.
After going through that “wizard” we will get to the point where we can make the “fine tuning” adjustments.
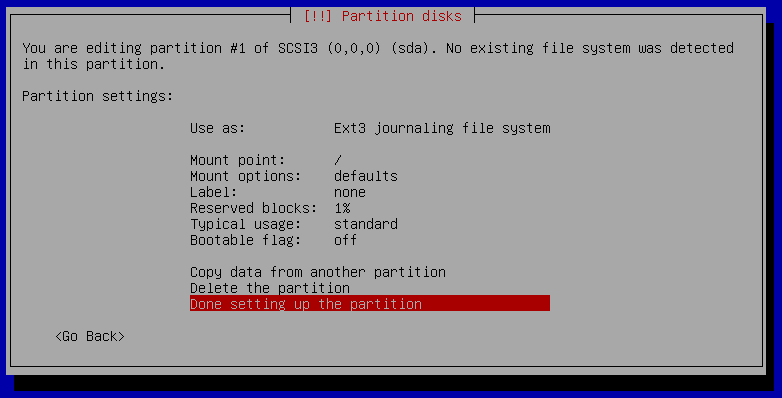
As you can see in the image below we have a bunch of options to set for the current partition, from setting the filesystem type (Use as:) to setting the Bootable Flag on or off (default will always be off, so if you are not planning on using the MBR (Master Boot Record) for boot and choose to create a special partition for it, make sure you set the bootable flag to on for that partition).
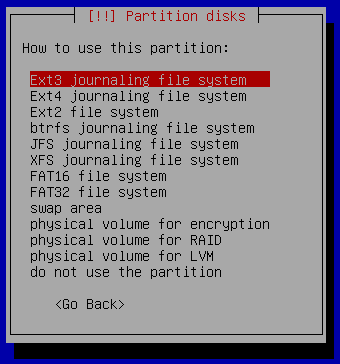
USE AS: – this menu give us the options to choose the filesystem type for our currently selected partition. In my case I will use Ext3 and swap area as I do not need any other type. I will explain the most important of them:
- XFS is a high-performance journaling file system created by Silicon Graphics, Inc. It is the default file system in IRIX releases 5.3 and onwards and later ported to the Linux kernel. XFS is particularly proficient at parallel IO due to its allocation group based design. This enables extreme scalability of IO threads, filesystem bandwidth, file and filesystem size when spanning multiple storage devices.
- JFS is a journaling file system. Rather than adding journaling as an add-on feature like in the ext3 file system, it was implemented from the start. The journal can be up to 128MB. JFS journals metadata only, which means that metadata will remain consistent but user files may be corrupted after a crash or power loss. JFS’ journaling is similar to XFS where it only journals parts of the inode.
- Ext2 or second extended filesystem is a file system for the Linux kernel. It was initially designed by Rémy Card as a replacement for the extended file system (ext).The canonical implementation of ext2 is the ext2fs filesystem driver in the Linux kernel. Other implementations (of varying quality and completeness) exist in GNU Hurd, MINIX 3, Mac OS X(third-party), Darwin (same third-party as Mac OS X but untested), some BSD kernels, in Atari MiNT, and as third-party Microsoft Windows drivers.ext2 was the default filesystem in several Linux distributions, including Debian and Red Hat Linux, until supplanted more recently by ext3, which is almost completely compatible with ext2 and is a journaling file system. ext2 is still the filesystem of choice for flash-based storage media (such as SD cards, and USB flash drives), since its lack of a journal minimizes the number of writes, and flash devices have a limited number of write cycles.
- Ext3, or third extended filesystem, is a journaled file system that is commonly used by the Linux kernel. It is the default file system for many popular Linux distributions, including Debian.Stephen Tweedie first revealed that he was working on extending ext2 in Journaling the Linux ext2fs Filesystem in a 1998 paper, and later in a February 1999 kernel mailing list posting. The filesystem was merged with the mainline Linux kernel in November 2001 from 2.4.15 onward. Its main advantage over ext2 is journaling, which improves reliability and eliminates the need to check the file system after an unclean shutdown.
- Ext4 or fourth extended filesystem is a journaling file system for Linux, developed as the successor to ext3. I do not use ext4 on my setup because of the backwards incompatibilities with ext3 file system.
- ReiserFS is a general-purpose, journaled computer file system designed and implemented by a team at Namesys led by Hans Reiser. ReiserFS is currently supported on Linux (without quota support). Introduced in version 2.4.1 of the Linux kernel, it was the first journaling file system to be included in the standard kernel. ReiserFS is the default file system on the Elive,Xandros, Linspire, GoboLinux, and Yoper Linux distributions.
- swap area is a “extension” of our RAM. If we use an application that takes up a lot of memory, if the memory is full, but the program still needs to write date, the reminder of the date will be written on the swap area. A good practice is to set the swap area 150% of your RAM amount => if you have 2 Gb RAM, your swap area should be 3 GB.
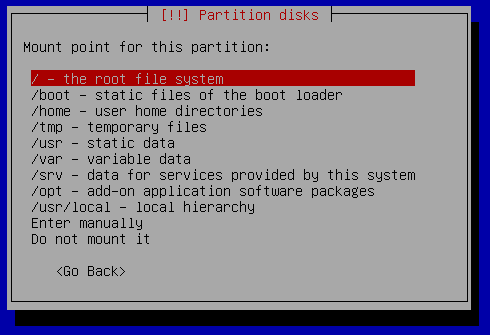
MOUNT POINT: – represents the “folder” of the OS that will reside on this partition. Like I’ve mentioned earlier some users will like to create separate partitions for specific folders. From the setup, Debian will let us to select a few options, as you can see in the image below, and it gives us the option to create manually a mount point through the option Enter manually. Usually when we create a mount point manually, we would like to keep in there information from another disk, or mount a windows disk (in mixed environments) just to have a general storage area that can be user by Linux OS as well as Windows OS.
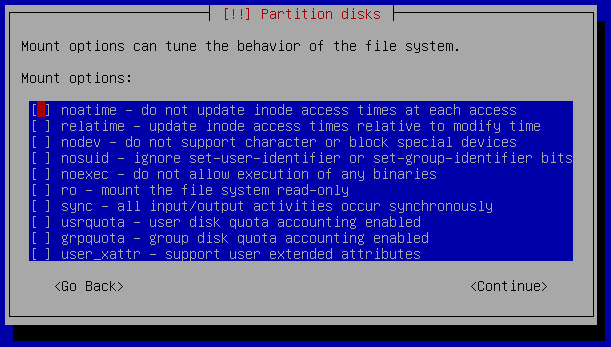
MOUNT OPTIONS: after we create our mount point we have to set the mount options: (as seen below). Choose all the mount options using UP and DOWN arrow keys to navigate through them and use SPACE to check the option. After you are done, hit TAB cu select <CONTINUE>. All the settings changed here will be written on fstab file, so if you discover an option that is not suited for your needs, you could always change it after the setup, by simply editing /etc/fstab.
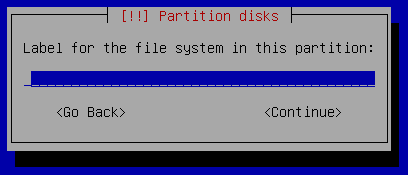
LABEL: we can also set the partition Label. In a system with many drives and partitions, it easy to forget which partition contains what data, so here in the installation proces we could “name” the partition in such manner, in future accessing we will know who contains what just by looking at the label.
RESERVED BLOCKS: (IMPORTANT – PLEASE READ)! In the Reserved blocks section we could set a “forced free space” on our partition. We can set this value only in a percentual fashion, just like you see in the image below (I set for mine to 1%, which will give me 4,6 MB free space). Why is this important? Well, imagine the next scenarion: your computer is user by more than one user. One of the users will store a large amount of data on his profile, so much data that will occupy all the remaining free space of your drive. Once he did that, if you do not have a reserved blocks option set on your drive, none of your users including yourself will be able to login on the machine. When we log into our linux box the OS is trying to write some data and if the drive is full the data won’t be written, thus the login will fail.
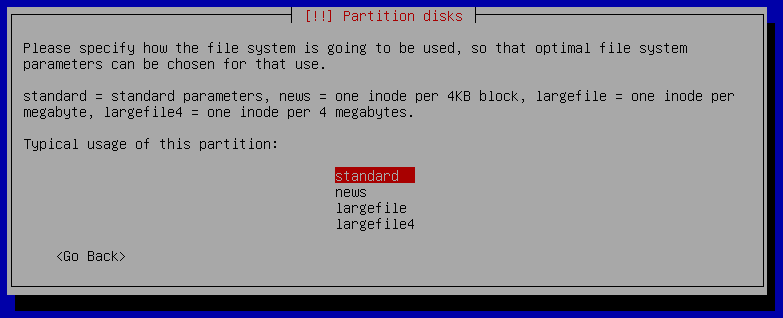
TYPICAL USAGE: in typical usage section we can set the length of the inodes.
We can choose from:
- STANDARD
- NEWS – 1 inode = 1 block of 4KB
- LARGEFILE – 1 inode = 1 block of 1MB
- LARGEFILE4 – 1 inode = 1 block of 4MB
I always use standard settings for this option.
And we are done setting one partition. After we chose all the options we can select Done setting up the partition and hit ENTER key.
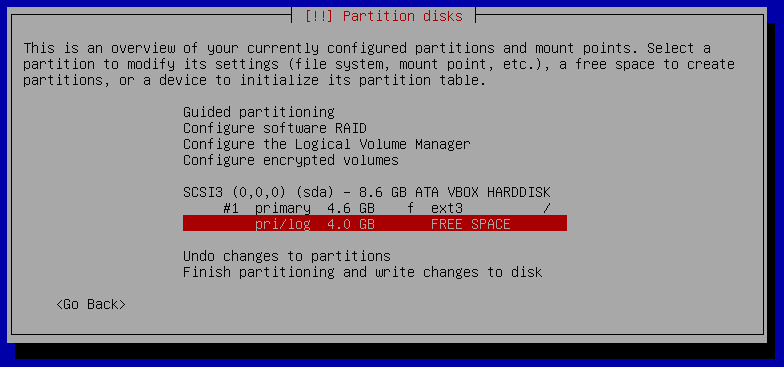
Our newly created partition will show up in the partition table. If we want to create another partition, we can go through the same process again just by selecting pri/log 4.0 GB FREE SPACE.
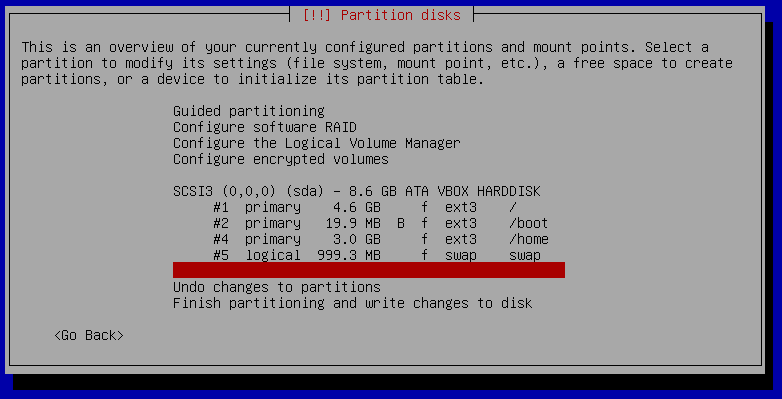
As an exercise I created 4 partitions:
- / – here will be all the files of my OS including the home directory of the root user (/root) – I recommend a 2% reserved block;
- /boot – here we will keep the files for GRUB or any other boot loader (if I decide later to change it);
- /home – here we will have the home directories for all the users in our system – I recommend a 5% reserved block;
- swap area – here will be the “extension” of our RAM;
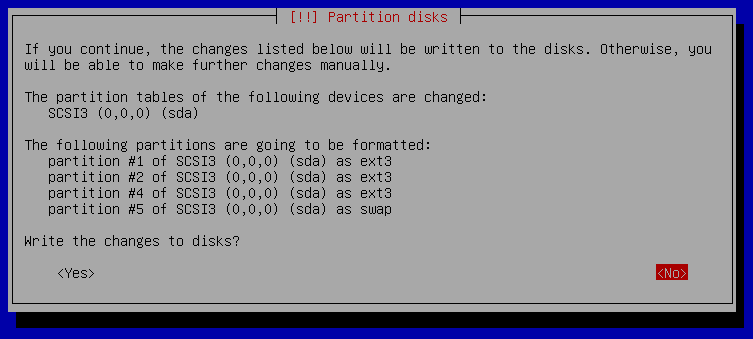
When we select the option Finish partitioning and write changed to disk we will have to confirm, by selecting <YES> and by pressing ENTER key.
Whit this I will conclude my tutorial on how to install Linux Debian and how to manually set partitions during Debian’s setup. If you have any questions or constructive criticism related to this post, please do not hesitate to leave me a comment or drop me a line at admin@itdev.ro.
